eSpatial can be a valuable resource helping you to:
- Plan your trips efficiently
- Identify the optimum accounts to visit
- Reduce travel time through route optimization
- And Update trips on the fly to reduce windshield time
Opening route on mobile
To open a route in mobile, log into eSpatial using your mobile browser or device, if your device is not in mobile version you can change your settings by selecting the User Dropdown and selecting View Mobile Version.

To open a map open the main menu and select open.


From here you can choose to see all maps or just your maps containing a route .

Select one of your route maps, this will open your route in map view and you can see an overview of your map route. To see your stops in detail select the route button.
-1.png?width=235&height=516&name=Day%20Trip%20-%20Training%20Video%20(Time%200_07_11%3B11)-1.png)
Sometimes while you're out in the field, an appointment might get cancelled. But rather than letting that time go to waste, you can make the most of it by checking which clients or leads are nearby.
One easy way to do this is by creating a buffer around your current location.
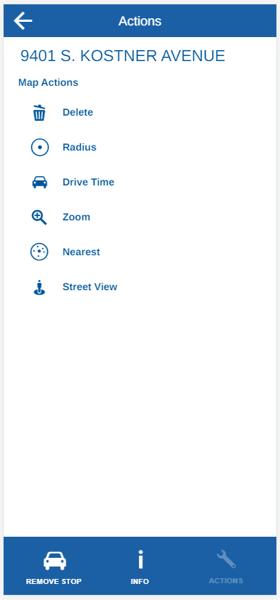
Click on the pin representing your location, then select Actions.
Next, choose Radius and enter your desired buffer distance — in this example, we’ll use 5 miles.
This will generate a circular area around your selected point, showing you which clients or leads fall within that range.


-1.png?width=286&height=624&name=Day%20Trip%20-%20Training%20Video%20(Time%200_05_51%3B24)-1.png)
You can also search for a specific address to find potential new leads in the area.
To do this, tap the Search button — this will open the address search bar.
Start typing the address you're looking for, and you’ll see a list of suggested matches.
You can either tap one of the suggestions, or press the Enter key on your mobile keyboard to view all matching results.
-1.png?width=281&height=613&name=Day%20Trip%20-%20Training%20Video%20(Time%200_06_25%3B26)-1.png)
-1.png?width=281&height=613&name=Day%20Trip%20-%20Training%20Video%20(Time%200_06_11%3B27)-1.png)
To edit your route, start by selecting the Route button. When the list of stops appears, tap Edit Route.
-1.png?width=281&height=617&name=Day%20Trip%20-%20Training%20Video%20(Time%200_06_32%3B03)-1.png)
-1.png?width=281&height=616&name=Day%20Trip%20-%20Training%20Video%20(Time%200_06_37%3B26)-1.png)
To add a new stop, click + ADD to manually enter an address, or use the Back button to select a point directly from the map.
-1.png?width=281&height=612&name=Day%20Trip%20-%20Training%20Video%20(Time%200_06_49%3B20)-1.png)
Once you've added your stops and chosen whether or not to optimise the route, tap Get Route to generate your updated route plan.
To open directions to a stop, tap Route, then click the map icon next to the desired stop. From there, choose your preferred navigation app — either Waze or Google Maps.
-1.png?width=281&height=618&name=Day%20Trip%20-%20Training%20Video%20(Time%200_07_15%3B13)-1.png)
.png?width=281&height=616&name=Day%20Trip%20-%20Training%20Video%20(Time%200_07_21%3B10).png)
After visiting a stop, you can update its information — such as adding notes or updating the last visited date. To do this, select the stop on the map, then tap Info. When the info box appears, click Edit and update the fields as needed.
-1.png?width=281&height=618&name=Day%20Trip%20-%20Training%20Video%20(Time%200_07_37%3B16)-1.png)